Acoustic-backed gluedown floors should be installed in accordance with these instructions as well as the applicable national standards and building codes for the installation of resilient flooring at the time of installation, to ensure a quality fit. These floors are not suitable for installation outdoors or in rooms that will be continually wet. Heavy rolling loads, including those from forklifts or pallet trucks, should be avoided.
The product meets the EN ISO 24343-1 standard for indentation; however, heavy point loads should be minimised where possible, or managed by using load-spreading plates or cups to distribute weight evenly.
Important: Failure to observe and follow these installation guidelines and/or current national standards and building codes at time of installation may result in any potential warranty claim being void.
National standards and building codes
European Union: DTU 53.2, DIN 18365 (Teil C)
United Kingdom: BS 8203
It is the responsibility of the installer to visually inspect all materials in optimal lighting to confirm it is the correct design, colour, batch, quality, free from defects and quantity as ordered. If the material or batching is incorrect or where defects are apparent, the store of purchase must be contacted before the material is installed. Complaints and claims regarding clearly identifiable defects will not be accepted after installation. Preparation and installation should not begin until all other trades have completed their work.
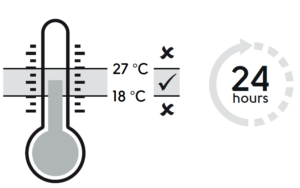
Flooring materials should be removed from packaging at least 24 hours prior to installation and allowed to condition in the room where installation is to take place (tiles/planks may be stacked but must be rested flat). Exposure to direct sunlight should be avoided during the acclimatisation and installation process by means of window coverings or temporary measures.
For optimum performance, room temperature should always be maintained between 18–27°C.
Subfloor preparation must comply with applicable national standards and building codes for the installation of resilient flooring at time of installation and in strict accordance with these installation guidelines.
The subfloor must be firm, hard, flat, level, smooth, dry, clean and dust-free and should be prepared dependent on your subfloor type. See the section Types of subfloor for specific preparation guidelines.
Moisture of the base subfloor (e.g. concrete) must be measured according to the relevant local standard.
- Where the hygrometer test is specified, the moisture of the subfloor must be less than 75% RH.
- Where the calcium carbide test is specified, construction moisture must be no more than 2% CM for cementitious screeds and no more than 0.5% CM for calcium sulphate screeds. For any subfloor showing a moisture value above these limits, a suitable damp proof membrane / moisture suppression system must be used.
NOTE: some national standards require the pH of the concrete slab to be controlled.
The design on this product is randomly distributed and can be heavier on some tiles/planks than others. To prevent heavy and light colour shading areas, the tiles/planks should be unboxed and shuffled.
- Lay the tiles and planks into spread adhesive, following the instructions of the specific adhesive type used, to ensure maximum bond strength and minimise the risk of peaking and gapping.
- Pulling the plank/tiles tight together can sometimes catch the acoustic backing between planks/tiles; be cautious of this while installing.
- Use a hand roller for each small section immediately as you progress. Wipe excess adhesive off immediately with a damp cloth.
- The whole area should be rolled in both directions after installation using a 68 kg roller or a hand roller in confined areas, paying particular attention to the edges.
- Ensure all planks and tiles are free from traffic for 24 hours after installation (or protect them from direct contact e.g. cover with board/sheeting).
- Clean-up surplus adhesive following manufacturer guidelines. For most adhesives, it is recommended that they are removed while still wet, using a damp cloth.
- Maintain climate conditions as per acclimatisation process after installation.
The acoustic backing of this product does not behave like a standard gluedown LVT and generally requires specialist adhesives to ensure adhesion.
F44 by F. Ball and KE2000S by Uzin have been tested with this product and shown to perform well. Planks must be laid into wet state adhesive only, resulting in a shorter open time than with typical LVT. When in doubt consult your adhesive supplier for advice.
Note:The company will not be liable for any loss, damage or complaint if the incorrect installation method or adhesive system is adopted for the installation, and/or the adhesive manufacturer’s instructions are not strictly followed.
1. Solid subfloors (concrete / sand cement screeds)
These subfloors should comply with the requirements of the national standards and building codes noted above.
New and old
For all concrete floors, mechanically abrade the floor to remove contamination (laitance, paint, plaster, adhesive etc). Apply a suitable damp proof membrane (as required), primer and underlayment system in accordance with the product manufacturer(s).
Power floated concrete
After using a water drop test to determine porosity (beading of water droplets), mechanical abrasive preparation either via diamond grinding, scarification or light shot blasting may be necessary to remove laitance and allow adhesive to disperse into the substrate.
Where moisture values exceed the limits noted above, these surfaces must still be abraded before the application of a suitable damp proof membrane/moisture suppression system.
‘Anhydrite’ (calcium sulphate-gypsum)
Anhydrite screeds can be difficult to identify and can be mistaken for more traditional cement-based products. Consult with the screed manufacturer to ensure what smoothing compounds, primers and sealers are required with your system. Ensure all surface laitance is sufficiently abraded and removed and the floor is sufficiently dry before proceeding.
Painted floors
Mechanically remove all paint back to the original base. Assess and treat as per the exposed subfloor; apply an appropriate primer and levelling compound in consultation with the underlayment supplier.
2. Wood subfloors (chipboard / particleboard / Weyroc / MDF / OSB)
Overlay with a 5.5 mm flooring grade plywood*, fixed according to national standards. Plywood joints should be smoothed over using skim coat/patch or using an appropriate primer and levelling compound by consulting your underlayment supplier. Plywood must be fixed according to manufacturer’s instruction and to national standards to eliminate potential movement later from changing climatic conditions.
Flooring grade plywood floors
Plywood joints should be smoothed over using skim coat/patch or using an appropriate primer and levelling compound by consulting your underlayment supplier. For any plywood floors with thickness less than 5.5 mm, treat as chipboard. Test for dampness and vacuum all dust to facilitate bonding.
Standard floorboards / tongue and groove
Floorboards should be well secured, loose boards firmly fastened, and worn/broken boards replaced. Install a minimum 5.5 mm flooring grade plywood*, fixed according to manufacturer’s instruction and to national standards. Plywood joints should be smoothed over using skim coat/patch or alternatively a suitable primer and levelling compound by consulting your underlayment supplier. For areas where frequent spillages are likely, use fibre cement sheets instead installed to manufacturer’s guidelines and current building codes.
Note:Being extremely porous, fibre cement sheets must first be primed with an appropriate primer and, where required, a smoothing or levelling compound, by consulting your underlayment supplier.
Undulating timber floors
These should first be levelled, by sanding or planing to remove undulations. Then overlay with flooring grade 5.5 mm plywood*. Using a suitable floor patch, fill in the plywood seams and fasteners. Alternatively, a suitable primer and smoothing compound may be used for patch-filling prior to installation of plywood or fabricated underlays, in consultation with your underlayment supplier.
Wood mosaic panel, woodblock, wood strip, laminate / click products
These floor coverings must be removed together with any underlay and flooring accessories. The subfloor should be treated appropriately.
*All plywood must conform to BS 8203 Annex A or equivalent national standard.
3. Other existing subfloors
Asbestos
Some older resilient tiles and adhesives can contain asbestos. Asbestos and asbestos adhesive residue must be mechanically removed by a professional abatement company prior to installing any LVT. In case of doubt contact the relevant authority for advice on removal and disposal.
Asphalt
Our product cannot be laid directly onto asphalt subfloors. A suitable smoothing compound should be applied in consultation with the underlayment supplier, with preparation of the asphalt in line with smoothing compound manufacturer’s guidelines, ensuring the asphalt is sufficiently degreased, cleaned and primed.
Metal floors
The metal surface should be cleaned, degreased and then mechanically abraded to remove contamination/rust and provide a surface key; it must be primed and levelled with the recommended levelling compound. Refer to supplier.
Quarry tile / mosaic / terrazzo / porcelain / ceramics
Test floor for evidence of damp. If dampness is detected consult your supplier. In most cases these substrates will not be sufficiently absorbent for the adhesive to disperse into the substrate. These should either be removed and the subfloor prepared and treated as per the exposed subfloor, or mechanically prepare the surface by thoroughly cleaning, rinsing and abrading the surface, taking extra care to ensure that the surface is firm, dry and free of wax, oil, dust and loose tiles/fragments and that all holes are repaired with a suitable fast-set repair mortar. Apply an appropriate primer and levelling compound by consulting your underlayment supplier, ensuring that all grout lines are filled with no show-through. A second topcoat of primer and levelling compound may be required to smooth over old tile grout lines.
Resilient floor coverings (e.g. linoleum, PVC, cork, thermoplastic, carpet)
Remove existing floor covering and all traces of adhesive residues. Then treat the subfloor appropriately.
Miscellaneous floors
Magnesite, Granwood, etc. Consult your supplier.
(Sunrooms/conservatories/areas adjacent to panoramic or floor to ceiling glazing/unheated rooms/high spillage wet areas.) The product is not intended for use in environments subject to significant temperature variations, in external or unheated areas. For high spillage areas please consult your adhesive supplier for a suitable adhesive.
Use of this product with underfloor heating is not recommended. Alternative acoustic products that are suitable are available from us; please contact your supplier.
- Use entrance mats to protect against grit and moisture.
- Ensure mats and rugs are not rubber-backed (use a non-staining variety) to prevent any discolouration of the floor.
- Avoid sliding or dragging furniture or other objects across the floor – use floor protector pads to prevent scratching.
- Use large castor cups or other means to protect against indentation from heavy furniture.
- Regularly sweep the floor to remove loose dirt or grit as these can cause fine scratches.
- For a thorough clean, a range of pH neutral cleaning materials are available. Avoid the use of household cleaners and bleach-based detergents; these could make the floor slippery or cause discolouration.
- Always mop up spills as soon as possible to reduce the risk of slipping and possible staining.
- Do not subject this flooring to standing water; this will present a slip hazard.
- Floor care guides are available from your supplier or the website.
